Zelda II: The Adventure of Link
In time this page will hold information about records, races, and strategies. We've also got records and races. See also the menu above for pages on specific topics.
Categories
Whatever mood you're in, Zelda 2 has a category for. Want a 10 minute game? Bam! Want a 75 minute game? Bam!
Zelda 2 has many, many categories due to historical accident. Traditionally there are three kinds of categories for a game like this: Any%, 100%, and New Game +. Zelda 2 only starts there.
We also have the "No OOB" variants of categories because people want to be able to run the game the old way, before the new routing which was made possible in late 2012 due to new glitches found.
We also have a couple of 'deathless' variants which were popularized by SDA, which are interesting not because they're the fastest, but because they're the hardest to run successfully.
Throw in the possibility of Japanese and European versions of the games, and Zelda 2 probably has more categories than any other game.
See this Categories page for a detailed explanation of better-known categories.
Differences between versions
General differences between versions are available at The Cutting Room Floor. Here are some speedrun-specific notes:
The version most run, with the highest level of competition, is the US NES version. It's the absolute fastest version for any category. The US Virtual Console version is speedrun-wise the same, except that you lose a second every 10 minutes due to the slightly-lower VC NES Framerate (~60.002 vs ~60.099).
The possible advantage of the Japanese FDS version - faster attack leveling - is mitigated by slower elevators, the addition of load times, the inability to pick up items as a fairy, the harder Dark Link AI, the inability to get 'scroll lock' in Glitch Town (you turned into a fairy instead), and the lower gem XP payoffs. The Japanese Virtual Console despite the lower framerate is faster than the original FDS hardware, due to the much shorter load times, though we're subtracting load times on leaderboards.
Approximiate FDS load times by version (These obviously vary quite a bit by specific route, but this just gives an idea of the load time differences by version):
* FDS: Variable, 6.4s on my FDS (204.8 seconds for a 100% All Keys run, 179.2s for an Any% run)
* Everdrive: 3.3s (105.6s AK, 92.4s Any%)
* Virtual Console: 1.4s (44.8s AK, 39.2s Any%)
* Powerpak: 1.3s (41.6s AK, 36.4s Any%)
An of FDS load times for the All Keys category is here.
Here is a spreadsheet to ease the calculation of the load times for an FDS run. Just plug in the four load times your FDS drive reader/emulator/VC/flash cart exhibits for Town Entry, Overworld Entry, Palace Entry, and your P7 disk flip. Then make sure the list of loads matches your run, adding any town/palace entries and exits as appropriate. Easy.
The PAL-B version is mostly like the US version, only with slower movement on the overworld, and the inability to fairy through doors. The PAL-A version does allow the fairy through door glitch.
Game Mechanics and Glitches
Experience and Leveling
If you do not level properly in this game, it gets harder, and harder, and the game quickly gets out of hand. Make sure to have Attack level 4 by the time you leave Palace 1. This requires some luck, and some practice. Know your 6 counts. Know your P bags. It's critical to learn how to manipulate your experience, to ensure the biggest possible payoffs at the end of each palace. Level Attack early, and make sure your "Next" level is Attack every time you put a gem into a statue at the end of a palace.
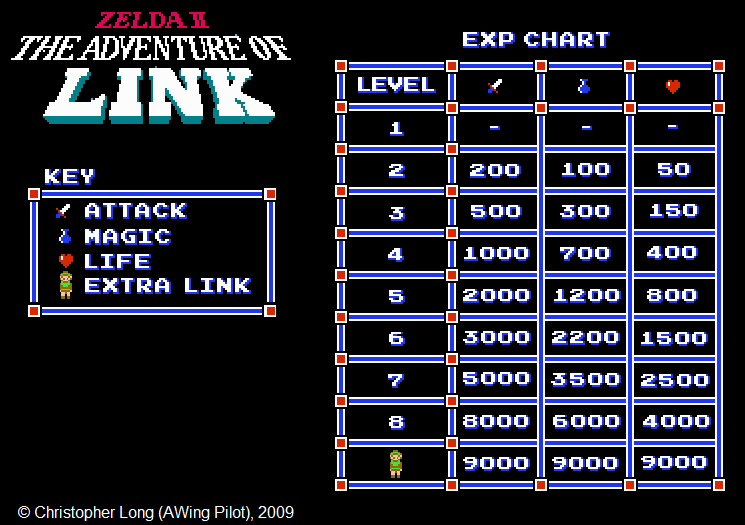
Know the experience chart, and know what monsters are left to kill in each palace (See the Maps for more).
Unwary has compiled a lot of interesting Zelda 2 data, showing experience, leveling, and attack and magic power, as well as some leveling plans. Here is his Google Docs spreadsheet of the data and Here is a PDF I made of the main charts.
Note that the FDS leveling is of course different. Here's the FDS leveling chart.
Drops and 6 Counts
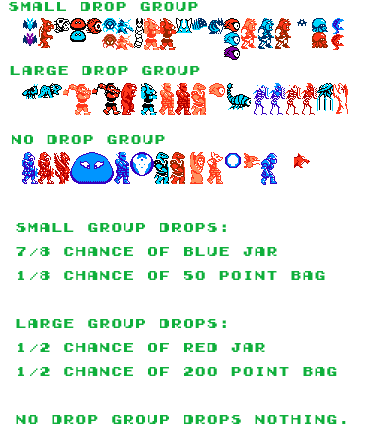
There are three kinds of enemies in this game: Enemies with no drops, enemies in the "small" group, and enemies in the "large" group. This is important to know, because when the enemies drop items is not random. Every sixth enemy you kill in a group will drop an item. Kills in one group to not affect kills in the other group. So, if you kill 5 Bots, then an Iron Knuckle, killing another bot after will cause a small drop. Likewise, killing 4 Iron Knuckles, then killing some Bots, then killing two Stalfos will cause a large drop on the second Stalfos. The kind of drop you get, however, is random. Small drops will usually be a blue jar, but have a 1/8 chance of being a 50-point P Bag. Large drops are equally likely to be a red jar or a 200-point P Bag. This means if you kill the same enemies, in the same order, every time you play the game, you will get drops at the same times. This is an important fact in routing the game, as well as in recovering from bad luck or mistakes.
Leaving the screen and respawning
A enemy will respawn in a cave (such as when backtracking in Hammer cave or in a palace) after being killed, if you leave the room before the experience starts to count off. Merely seeing the "100" or whatever floating in the air is not sufficient. It must start counting up in your experience total for it to count.
That kill will still count for your drop counts, even if you leave too soon. However leaving too soon prevents you from getting the experience, and makes sure the enemy will respawn.
As long as the experience starts to count up though, you'll continue to get the rest on the next screen. You will also get the rest if you up-a, save, and then load another save file. The rest of the XP total will count off (that also happens with experience rewards at palace gems...)
Fairying through Doors
In the JP FDS and US NES versions, if you have no keys, and are in fairy form, you can go through a door without using a key.
If you have a key, a key will be used, even if you're in fairy form.
However note that in the JP FDS version, you can't pick up an item in fairy form, so in that version this isn't useful for doors guarding items, such as the glove, the raft, the boots, and the flute.
The Healer Glitch and Glitch Town
Fairy Feet / Encounter Skip Glitch
The Darunia Superjump
The traditional strategy for getting up to get the Upward Stab was to use a frame perfect jump:
But now the easier path is just to hold down while casting fairy. That allows Link to go down the chimney as fairy.
Luck Manipulation
Daira Jumping
As mentioned in the combat section, monster AI tends to read your D-Pad.
This can be used to your advantage to skip certain enemies. Goriyas, Dairas, and Molblins can be jumped over by getting a good running start, and letting off of right or left on the dpad while in the air. This will change their movement and let you get right over them.
Getting over Iron Knuckles is harder, because their AI is different. A straight daira jump isn't as effective, because instead of freezing in place when you let off of the D-Pad in the air, they begin to meander around randomly.
So with an iron knuckle you really want to do a daira jump, then downstab on their heads. Even then it won't always work, because sometimes you'll get really bad movement patterns when they move randomly.
The Palace 5 "Eco Key"
The first key in Palace 5 teases the player. You are meant to fairy past it, then backtrack to get it.
Pro_JN discovered that it's possible to damage boost to it without casting fairy. Here is Riiyak's tutorial.
Combat Techniques
The most important thing to know is to keep your momentum. If you're moving forward, you can keep hitting enemies, instead of letting them hit you while staying alive. This means that generally, the worst possible attack to make is the standing sword attack. It's slow because of the backswing, and you stop to make the attack. Better is the crouching sword attack. It's faster than the standing attack, but it also kills your momentum. However certain enemies are bad to crouch stab, such as the ever-annoying Tin Suits, who have top-heavy hit boxes. Jumping is the key to combat in Zelda 2. Often a jumping crouch thrust is best. Sometimes you will want to jump, crouch, and then thrust on your way down from your jump. Against other enemies, or for a final attack, you may want to attack while you're coming up in your jump. Enemies like Iron Knuckles need special techniques. Jump at them, do not crouch, and then thrust on the way down to hit them in the visor. However in a two square-high corridor, there isn’t room to jump. Instead, when facing an orange or red Iron Knuckle in this situation, press A then B right after, very quickly, to get attacks in. A blue Iron Knuckle can defeat this. Instead do jumping crouch stabs (most notable at the last key in palace 5).
The Jackhammer
The downstab is a powerful attack. While the game limits the frequency of sword stabs that are possible by pressing B, it does not limit the number of stabs possible by pressing down to do a downstab. This means that getting on top of an enemy and mashing down will get in many hits quickly. The Jackhammer is possibly most notable against Iron Knuckles in three tile high corridors (often seen it front of items). By jumping into the iron knuckle and doing a downstab, it's possible to get *inside* the enemy doing a downstab. By mashing down, one can hit the enemy over and over, killing the Iron Knuckle (or getting through it with a lot of damage done at least) without doing any damage at all to Link. Other useful jackhammer opportunities: Dragon heads, Bubbles (in a casual run or a no-reset run where 50xp is needed), Barba, (in theory) Boss Gooma, Horsehead, Helmethead (after the helmets are removed).
The Whirlwind and the Panicked Dolphin
Related to the jackhammer is the whirlwind. Primarily used in TASes, the whirlwind does aerial crouch stabs, while alternating pressing left and right. Similarly to how mashing down will create multiple hits, so too will constantly changing directions. It's rare that this is doable and practical in a live run, but there is one enemy whom it is useful to attack in this way, or at least try: Thunderbird. Sometimes, you'll just get lucky by mashing around like a panicked dolphin. (Error deleted the original 'panicked dolphin' video. Here's the next best thing.
Bosses
An important note about bosses: Don't kill a boss when he's too far off screen (mostly applies to Rebonack on the left), or the game will softlock because the key won't drop.
Encounters
Spawns
There are two types of overworld encounter spawns that can happen. One spawn is based on steps, one on time.
The overworld random encounter timer always counts down, even in a side scrolling area. When it reaches 0, enemies spawn. If you are on a path, it stays at 0 until you step on terrain that can spawn enemies.
The timer resets to 8 ticks upon exiting a side scrolling area. If you are standing on the overworld when it reaches 0, it resets to a new number of ticks. The number of ticks is based on what terrain you are standing on when the time encounter is spawned.
- Grass, Swamp 32 Ticks
- Desert, Forest 24 Ticks
- Graveyard 9 Ticks
- Lava 3 Ticks
When a tick counts down is based on a global timer, usually every tick takes 21 frames. However, the first tick will be variable. It could be 1 through 21. Only where you are standing when the counter is set from 0 affects the time. Moving to a new terrain has no effect once the timer is already counting.
Link moves at about 1 tile every 16 frames, so this works out to be between 10 and 11 steps (~2.8 seconds) before you can expect an encounter when coming out of a side scrolling area. This will always be the first type of spawn you see.
Overworld step counter for random encounters counts up from 1 to 255, increasing by 16 each step. When it rolls over 255 it resets to 1 and monsters spawn. This means every 16 steps there will be an encounter spawn. Terrain does not affect steps-- the path also counts as a step, so if the 16th step is on a path, no encounter will spawn for that cycle. Resets to 1 upon exiting a side scrolling area.
In northwest Hyrule, the area around north palace and palace 1, the step counter isn't active and as such you can never get a step encounter there.
Here is an alternate writeup of this information
Movement
One fourth of the time, overworld monsters will perform a random walk in any direction. The rest of the time, overworld encounters will try to home in on you Their movements follow this pattern, depending on the monster's position relative to link:
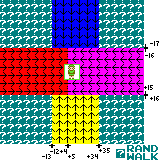
Consequences of this include:
- If a monster is far away from you, up in one of the random walk quadrants, there's a good chance it'll never get near you.
- If a monster is moving horizontally just above or just below you, it will only break out of that pattern by a random walk.
Credit to myask for this work.
How to Dodge Encounters
Be lucky. Okay, that's only partially true. You can always get a random walk in your way that absolutely ruins your day, but there are ways to try to avoid encounters.
First, know when the spawns are going to happen. That means having a good feel for both the timer and step spawns. Second, use the pause button liberally, to give yourself time to read and react. Third, get just close enough to the enemy that it commits to walking toward you, then dodge and go past. This strategy is commonly employed in 100% runs when coming up toward Palace 1 from the Parapa heart, as well as when going to and from Palace 3. However it can be used to "slink thru" (as Pro_JN called it) anywhere with enough practice and skill.
Sometimes there are certain patterns, where we can specifically line up the timer and step spawns to show up at convenient times, so that we can make practiced, fixed dodges that work virtually every time. See for example the 'Dazzle' technique from Maze Island to Darunia, where the runner starts from the 1up square, and gets all the way to the first fixed encounter outside Darunia. Also the 'JN' technique of taking an encounter (or doing a 5 step backtrack fallback strat) at the square beside the boulder guarding Mido, on the way to the Medicine cave. Finally, another common example of this is the Badbrakes 'Riverdance' which set up an encounter-free run from the Ocean heart to the river demon guarding the path to Palace 6.
Casting during Magic Fill-ups
There is an art to getting life refills while taking magic fill-ups in the run. Ideally we'll just never get hit, but most of us are human, so we use the Life spell.
When taking a red jar, it will give you an amount of magic that would fill your magic bar up completely, even if it's already partially filled. So if you cast a spell after taking the jar, but before the jar fill-up completes, you can get more magic out of the jar than you otherwise would.
For example: If you have 5 total bars (80 points) of magic, and have cast a Magic 1 Jump spell (48 points), you'll have 2 bars (32 points) remaining. If you take a red jar, then cast Jump again while the red jar fill-up happens, you'll end with 4 bars (64 points). 32 + 80 - 48 = 64.
Further, it is possible to cast a spell in the small window between beginning the sword slash to pick up the jar, and when the jar is picked up. This means one can fairy, then pick up a red jar, and end at full magic. Credit to Simpoldood for developing this trick in runs.
When speaking to a magic lady in town, she will give a fixed amount of magic to you: 255 points (just under 16 bars). This means typically one can cast several spells before losing a full fill-up potential, but the amount is finite. Credit to Scorpion__Max for finding this number.
Valley of Death Red Jar
The jar at the beginning of the Valley of Death is known for despawning. SDA user fiskbit examined the situation. It turns out there's a glitch, where a memory location ($071F) that remembers whether the red jar has been taken, is overwritten by other things in the game.
Long story short, if you attempt the encounter skip at the start of the Valley of Death but fail, you have to scroll the screen to the right, before leaving the screen back to the left to try again. If you don't, you risk despawning the jar.
It's also possible to re-spawn the jar using the same glitch, but it's probably not useful in a speed run.
The XP Softlock
There is a glitch in the game that is actually very harmful for the player. It turns out that if you happen to leave a side-scroll screen (town, road, encounter, palace, anything) just as your experience total hits the amount needed for the next level, the game will lock up. It's known as 'the softlock,' because it's purely a software glitch, which places the game into a completely frozen state. It's impossible to recover from.
Try not to leave a screen too close to when your experience total will hit your next level. That's the only way to avoid the soft lock.
It's believed that the Virtual Console may be more resistant to the softlock, but it's not immune. Beware!
Beginning Advice
Run the 100% All Keys category. It's the best introduction to the game.
Here's Simpoldood's tutorial series and Error's impromptu tutorial
Here's an Any% No OoB tutorial
All Keys Route
A true beginner to the game may not even know where to go or, worse, will emulate the routes used by the very best players playing the hardest game categories. This is a mistake. My advice is to follow this route:
- Magic Container south of North Palace
- Town of Rauru – Shield Spell
- Heart Container south of Palace 1
- Palace 1: Parapa – Candle
- Trophy
- Town of Ruto – Jump Spell
- 1-up south of Medicine
- Bagu
- Town of Saria – Life Spell
- Death Mountain – Hammer
- Magic Container west of Hammer
- 1-up southwest of Mido
- Heart Container east of Palace 2
- Medicine
- Town of Mido – Fairy Spell, Downward Thrust
- Palace 2: Midoro – Handy Glove
- Palace 3: Island – Raft
- Town of Nabooru – Fire Spell
- 1-up west of Maze Island
- Magic Container on Maze Island
- Palace 4: Maze – Boots
- Lost Child
- Town of Darunia – Reflect Spell, Upward Thrust
- Palace 4: Complete
- Heart Container north of Palace 5
- Palace 5: Ocean – Flute
- 1-up north of the Valley of Death
- Town of New Kasuto – Magic Container, Spell Spell, Magic Key
- Heart Container east of Palace 6
- Palace 6: Hidden – Cross
- Town of Kasuto – Thunder Spell
- Palace 7: Great
This is a basic route that, if executed well enough, would produce respectable times in the 100% All Keys category, assuming the runner does not fairy through doors.
Maps
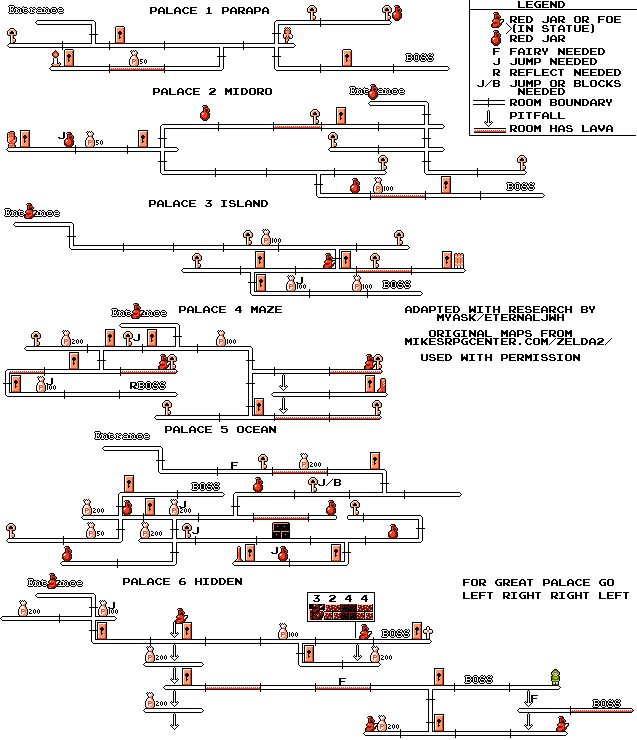
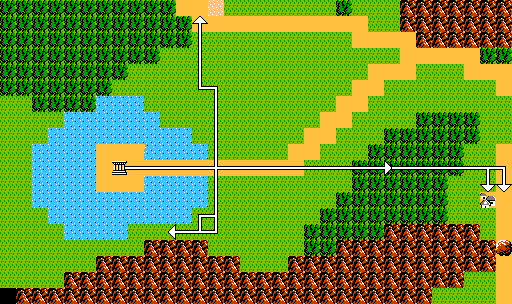
If you don't know where these places are, or how to get through the dungeons, there are maps to help. Mike's RPG Center has great maps, though a beginner may find the palace maps of NESMaps.com easier to read. An intermediate form based on Mike's with extra details added is here, with Great Palace map here. A diagram showing some of the ways that do not result in encounters from the beginning is here. Here's a little animation that could serve as a reminder of the route. I link it because it's cute:  Only after mastering this route should the runner attempt more advanced routes, such as those run by the top any% runners, which include skipping the candle entirely, getting the Fairy spell before Palace 1, and skipping spells like Life or Spell.
100% All Keys Leveling Plans
Here's the leveling plans page because it was getting too large to keep inline here.
Palace 1 Leveling Options
The usual way to start the All Keys run is to get a 50 point bag and a 200 point bag from random drops, and reset if you don't get it. But unless you're going for a World Record, that may not be the best option. Consider all the choices before deciding what to do for your speed runs.
| Strategy | Description | Advantages | Disadvantages |
| Proceeding with Attack 3 | Normally with 4-1-1 out of Palace 1, you proceed to take Magic 2 and Life 3 during death mountain, and be 5-2-3 at the Palace 2 Gem. Instead, you can just go with 3-1-2 out of Palace 1, and be 5-1-2 at the Palace 2 Gem. | Not resetting lets you practice more of the run. The combat practice helps some people. | It's harder for new players, because you don't get the free fill ups from Magic 2, Life 2, and Life 3. It can lead to a game over. Lastly, it requires some drop luck, or you will be unable to catch up in levels at all. |
| Kill Bubbles | To make up for missed 50 or 200 point bags, you can kill 50xp Bubbles over and over. | It saves a lot of walking over other fall backs, and isn't hard. | Bubbles get tedious. |
| Loop Palace 1 | If you're short for attack 4, you can jump over the spot that triggers the Palace 1 Gem, re-enter the palace, and kill a few enemies on the way in. | It guarantees attack 4 in a beginner-friendly way with a small time loss. | It's slower than the other options, unless you're unable to finish an Attack 3 run. |
| Reset | You can always just reset. | Having a consistent set of conditions lets you squeeze the most out of your runs. | It's not race viable to reset 8 minutes in, and you don't get to practice the rest of the game, where most of your time savings probably are. |
Miscellaneous Tips
100% Deathless Routing
FDS Any% Routing
Records
The old Red Candle / Nintendo Records boards have moved to speedrun.com, but we've also recently found these Japanese runners on the Nico RTA wiki.
Note that apart from loading times, you have to subtract 56 seconds to convert a time from the Nico board, to SDA timing.
Challenges
Some people have also run some challenges, for speed or otherwise. Here's a list of challenge runs.
Glitched Routing
John 'Pro_JN' Nurminen discovered in December 2014 that if you do the 'scroll lock' glitch using an alternate routing (alt glitch, or 1 door-4 door glitch) of going through one door as usual, then going through the shield spell door 4 times, you can get access to different things.
Simpoldood has done extensive route research based on this technique, useful for 100% category, as well as novelties like Reverse Boss Order (now made practical with this glitch method).
Here's a tutorial of the then-18:53 WR Any% Route.
Theory TAS
Here's an All-Keys Theory TAS by Boats60. 1:11:58 by SDA timing!
Randomizer
IRC and Races
Traditionally most Zelda 2 plotting happened over Skype, in a private Zelda 2 Skype group. There were IRC channels in theory, but they were never really used. Not that there was ever much Zelda 2 racing.
The best way to get in touch with folks about Zelda 2 races is to follow the Zelda 2 Crew on Twitch and on hitbox. Connect with Zelda 2 runners there and get involved. A number of Zelda 2 runners like races, even if they never really happen.
Zelda 2 Randomizer races, however, those are happening a lot more often. Contact Zelda 2 Crew folks about the Zelda 2 Discord created by Opus, to get in on that.
Humor
History
Resources
Hitbox viewer script in Lua by Pasky
Save States
Everdrive All Keys save states courtesy of BluntBunny
Everdrive any% deathless savestates
Here are some new All Keys save states created by riiyak:
Riiyak All Keys savestates for Everdrive 1.21 and prior
Riiyak All Keys savestates for Everdrive 1.22 and later
Videos
Simpoldood's All Keys tutorial series
PresJPolk's Any% No OoB tutorial
xJohnWaynex's 100% No OoB beginner route tutorial
antii85's 100% Deathless tutorial