Zelda II: The Adventure of Link
In time this page will hold information about records, races, and strategies. We've also got [records/ records] and [races/ races]. See also the menu above for pages on specific topics.
Categories
Most of the popular Zelda 2 speed running categories come from SDA. These include the Any% and 100% SDA categories. But these categories are very difficult for entry-level Zelda 2 speed running, so another category has also become popular: the 100% All Keys category, based on the old Twin Galaxies Extreme Rules category. Read more about the categories.
Game Mechanics and Glitches
Experience and Leveling
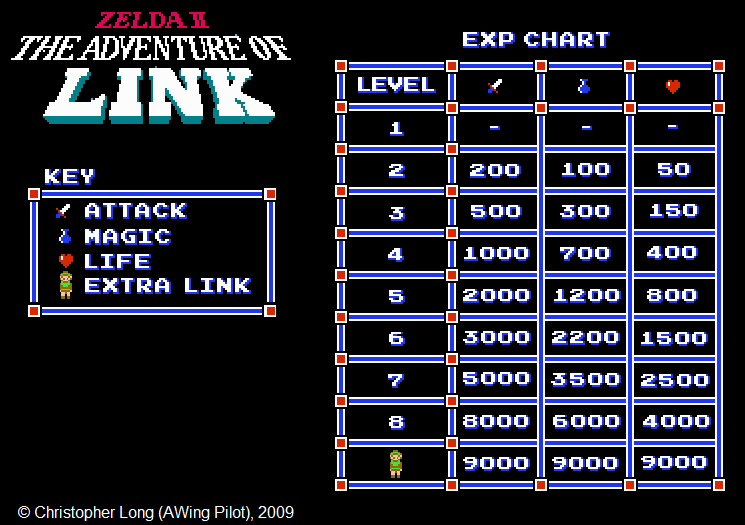
If you do not level properly in this game, it gets harder, and harder, and the game quickly gets out of hand. Make sure to have Attack level 4 by the time you leave Palace 1. This requires some luck, and some practice. Know your 6 counts. Know your P bags. It's critical to learn how to manipulate your experience, to ensure the biggest possible payoffs at the end of each palace. Level Attack early, and make sure your "Next" level is Attack every time you put a gem into a statue at the end of a palace.

Know the experience chart, and know what monsters are left to kill in each palace (maps to come here soon)
Drops and 6 Counts

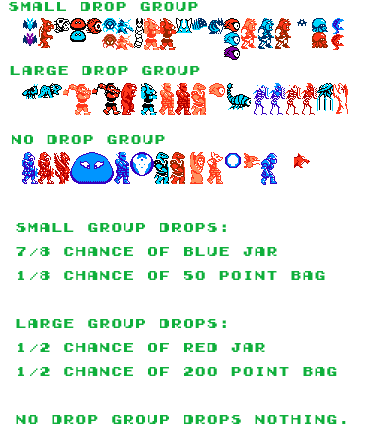
There are three kinds of enemies in this game: Enemies with no drops, enemies in the "small" group, and enemies in the "large" group. This is important to know, because when the enemies drop items is not random. Every sixth enemy you kill in a group will drop an item. Kills in one group to not affect kills in the other group. So, if you kill 5 Bots, then an Iron Knuckle, killing another bot after will cause a small drop. Likewise, killing 4 Iron Knuckles, then killing some Bots, then killing two Stalfos will cause a large drop on the second Stalfos. The kind of drop you get, however, is random. Small drops will usually be a blue jar, but have a 1/8 chance of being a 50-point P Bag. Large drops are equally likely to be a red jar or a 200-point P Bag. This means if you kill the same enemies, in the same order, every time you play the game, you will get drops at the same times. This is an important fact in routing the game, as well as in recovering from bad luck or mistakes.
The Healer Glitch and Glitch Town
The Darunia Superjump
Luck Manipulation
Combat Techniques
The most important thing to know is to keep your momentum. If you're moving forward, you can keep hitting enemies, instead of letting them hit you while staying alive. This means that generally, the worst possible attack to make is the standing sword attack. It's slow because of the backswing, and you stop to make the attack. Better is the crouching sword attack. It's faster than the standing attack, but it also kills your momentum. However certain enemies are bad to crouch stab, such as the ever-annoying Tin Suits, who have top-heavy hit boxes. Jumping is the key to combat in Zelda 2. Often a jumping crouch thrust is best. Sometimes you will want to jump, crouch, and then thrust on your way down from your jump. Against other enemies, or for a final attack, you may want to attack while you're coming up in your jump. Enemies like Iron Knuckles need special techniques. Jump at them, do not crouch, and then thrust on the way down to hit them in the visor. However in a two square-high corridor, there isn’t room to jump. Instead, when facing an orange or red Iron Knuckle in this situation, press A then B right after, very quickly, to get attacks in. A blue Iron Knuckle can defeat this. Instead do jumping crouch stabs (most notable at the last key in palace 5).
The Jackhammer
The downstab is a powerful attack. While the game limits the frequency of sword stabs that are possible by pressing B, it does not limit the number of stabs possible by pressing down to do a downstab. This means that getting on top of an enemy and mashing down will get in many hits quickly. The Jackhammer is possibly most notable against Iron Knuckles in three tile high corridors (often seen it front of items). By jumping into the iron knuckle and doing a downstab, it's possible to get *inside* the enemy doing a downstab. By mashing down, one can hit the enemy over and over, killing the Iron Knuckle (or getting through it with a lot of damage done at least) without doing any damage at all to Link. Other useful jackhammer opportunities: Dragon heads, Bubbles (in a casual run or a no-reset run where 50xp is needed), Barba, (in theory) Boss Gooma, Horsehead, Helmethead (after the helmets are removed).
The Whirlwind and the Panicked Dolphin
Related to the jackhammer is the whirlwind. Primarily used in TASes, the whirlwind does aerial crouch stabs, while alternating pressing left and right. Similarly to how mashing down will create multiple hits, so too will constantly changing directions. It's rare that this is doable and practical in a live run, but there is one enemy whom it is useful to attack in this way, or at least try: Thunderbird. Sometimes, you'll just get lucky by mashing around like a panicked dolphin.
Bosses
Encounters
Spawns
There are two types of overworld encounter spawns that can happen. One spawn is based on steps, one on time.
The overworld random encounter timer always counts down, even in a side scrolling area. When it reaches 0, enemies spawn. If you are on a path, it stays at 0 until you step on terrain that can spawn enemies.
The timer resets to 8 ticks upon exiting a side scrolling area. If you are standing on the overworld when it reaches 0, it resets to a new number of ticks. The number of ticks is based on what terrain you are standing on when the time encounter is spawned.
- Grass, Swamp 32 Ticks
- Desert, Forest 24 Ticks
- Graveyard 9 Ticks
- Lava 3 Ticks
When a tick counts down is based on a global timer, usually every tick takes 21 frames. However, the first tick will be variable. It could be 1 through 21. Only where you are standing when the counter is set from 0 affects the time. Moving to a new terrain has no effect once the timer is already counting.
Link moves at about 1 tile every 16 frames, so this works out to be between 10 and 11 steps (~2.8 seconds) before you can expect an encounter when coming out of a side scrolling area. This will always be the first type of spawn you see.
Overworld step counter for random encounters counts up from 1 to 255, increasing by 16 each step. When it rolls over 255 it resets to 1 and monsters spawn. This means every 16 steps there will be an encounter spawn. Terrain does not affect steps-- the path also counts as a step, so if the 16th step is on a path, no encounter will spawn for that cycle. Resets to 1 upon exiting a side scrolling area.
In northwest Hyrule, the area around north palace and palace 1, the step counter isn't active and as such you can never get a step encounter there.
Movement
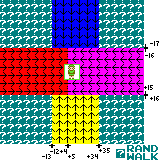
One fourth of the time, overworld monsters will perform a random walk in any direction. The rest of the time, overworld encounters will try to home in on you Their movements follow this pattern, depending on the monster's position relative to link:

Consequences of this include:
- If a monster is far away from you, up in one of the random walk quadrants, there's a good chance it'll never get near you.
- If a monster is moving horizontally just above or just below you, it will only break out of that pattern by a random walk.
Credit to myask for this work.
Beginning Advice
Run the 100% All Keys category. It's the best introduction to the game.
All Keys Route
A true beginner to the game may not even know where to go or, worse, will emulate the routes used by the very best players playing the hardest game categories. This is a mistake. My advice is to follow this route:
- Magic Container south of North Palace
- Town of Rauru – Shield Spell
- Heart Container south of Palace 1
- Palace 1: Parapa – Candle
- Trophy
- Town of Ruto – Jump Spell
- 1-up south of Medicine
- Bagu
- Town of Saria – Life Spell
- Death Mountain – Hammer
- Magic Container west of Hammer
- 1-up southwest of Mido
- Heart Container east of Palace 2
- Medicine
- Town of Mido – Fairy Spell, Downward Thrust
- Palace 2: Midoro – Handy Glove
- Palace 3: Island – Raft
- Town of Nabooru – Fire Spell
- 1-up west of Maze Island
- Magic Container on Maze Island
- Palace 4: Maze – Boots
- Lost Child
- Town of Darunia – Reflect Spell, Upward Thrust
- Palace 4: Complete
- Heart Container north of Palace 5
- Palace 5: Ocean – Flute
- 1-up north of the Valley of Death
- Town of New Kasuto – Magic Container, Spell Spell, Magic Key
- Heart Container east of Palace 6
- Palace 6: Hidden – Cross
- Town of Kasuto – Thunder Spell
- Palace 7: Great
This is a basic route that, if executed well enough, would produce respectable times in the 100% All Keys category, assuming the runner does not fairy through doors.
Maps
If you don't know where these places are, or how to get through the dungeons, there are maps to help. Mike's RPG Center has great maps, though a beginner may find the palace maps of NESMaps.com easier to read. An intermediate form based on Mike's with extra details added is here, with Great Palace map here. A diagram showing some of the ways that do not result in encounters from the beginning is here. Here's a little animation that could serve as a reminder of the route. I link it because it's cute:  Only after mastering this route should the runner attempt more advanced routes, such as those run by the top any% runners, which include skipping the candle entirely, getting the Fairy spell before Palace 1, and skipping spells like Life or Spell.
Sample Leveling Plans
This was the leveling made known by John 'Pro_JN' Nurminen. It's relatively easy to pick up, and used to set world records.
- At Palace 1 Gem: 3/1/1
- After Palace 1: 4/1/1
- At Hammer: 4/2/3
- At Palace 2 Gem: 5/3/3
- After Palace 2: 6/3/3
- At Palace 3 Gem: 6/3/4
- After Palace 3: 7/3/4
- After Palace 4: 7/3/7
- At Palace 5 Gem: 7/3/8
- After Palace 5: 7/7/8
- After Palace 6: 7/8/8
Here is a more advanced leveling plan, used by some other record-setting runners. Credit to Feasel for walking me through it:
- At Palace 1 Gem: 3/1/1
- After Palace 1: 4/1/1
- At Hammer: 4/2/3
- At Palace 2 Gem: 5/3/3
- After Palace 2: 6/3/3
- At Palace 3 Gem: 6/3/4
- After Palace 3: 7/3/4
- At Palace 4 Gem: 7/4/4
- After Palace 4: 8/4/4
- At Palace 5 Gem: 8/4/5
- After Palace 5: 8/6/7
- After Palace 6: 8/7/7
- Entering Palace 7: 8/8/7
Note that to use this leveling, you must make sure to trigger the full 9000 XP rewards at Palace 5 and at Palace 6.
Here's a variant of the 8/7/7 leveling, which addresses the possibility of not getting 4/1/1 out of Palace 1. Credit to Duxcub, Solairflaire, and Pro_JN in helping me get it nailed down:
- At Palace 1 Gem: 2/1/1
- After Palace 1: 3/1/1
- At Hammer: 4/1/2
- At Palace 2 Gem: 5/1/2
- After Palace 2: 6/1/2
- At Palace 3 Gem: 6/2/4
- After Palace 3: 7/2/4
- At Palace 4 Gem: 7/4/4
- After Palace 4: 8/4/4
- At Palace 5 Gem: 8/4/5
- After Palace 5: 8/6/7
- After Palace 6: 8/7/7
- At Great Palace: 8/8/7
Records
Theory TAS
Here's an All-Keys Theory TAS by Boats60. 1:11:58 by SDA timing!
IRC and Races
Zelda 2 races and chat can be had on two different IRC networks. #zelda2 on irc.speeddemosarchive.com or on irc.speedrunslive.com are both open for business. Choose whichever one you like, or both.