The Legend of Zelda
Getting Started
Here are some resources commonly requested by new players:
Picking an emulator: The Legend of Zelda/Emulators
Route options: Order of the Ate has a list of popular routes that are easier to finish, with a sliding scale of time/difficulty tradeoffs.
Tutorial videos: The Legend of Zelda/Tutorial Videos
Basic maps: NESMaps
Discord: Invitation to Lack's LoZ Discord server
Version differences
Here is an entire page devoted to version differences.
Categories
The categories, and their rules, are all documented at speedrun.com's board.
If those categories aren't enough, there's also a Category Extensions board with its own rules in the forum sticky posts.
Game Mechanics and Glitches
Screen Scroll
The 'screen scroll' trick is useful for getting over overworld obstacles, as well as for clipping through blocks in dungeons. That means you get to some stairs without killing all the enemies first! Here's a graphic with some pointers:
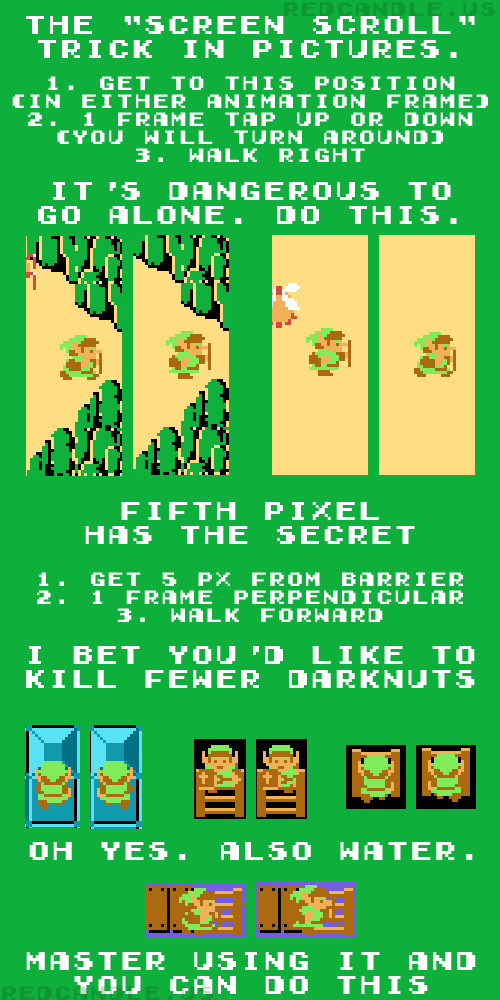
Since the above chart was made, an alternate way of clipping through a block has been discovered by はる@よつば. First, you get onto the pixel as in the above picture, with the top of Link's head lined up with the flat part of the block. Then, instead of doing a single-frame tap, slash the sword and press right or left. The sword slash, done correctly, will prevent you from moving. You will get the same effect as the single frame tap, so if you're positioned right, you will turn around. After the sword slash, walk through the block. This trick only works with block clips, not overworld scrolls or ladder clips.
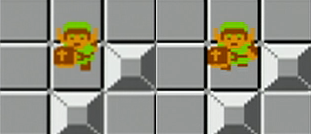
Here's an additional quick demonstration of the pixels for the "reverse" clip:
Drops
Random drops
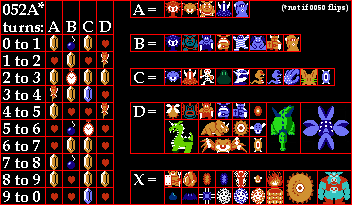
The enemy drops are not random. Whether they do drop an item is random, but when they do drop, here's what they'll be. The counter starts at 0, and goes up by 1 every time you kill (most) enemies. Zols' gels and vires' keese do not advance the counter. Chart via Baxter at TASVideos:
Drop Rates
The chance of getting a drop from group A is 80/256 = 31%.
Group B: 104/256 = 41%
Group C: 152/256 = 59%
Group D: 104/256 = 41%
Forced drops
However there are also the consecutive kill counters. Kill 10 enemies without getting hit (by an enemy, even a non-damaging bubble, or by the whirlwind from the recorder) and you'll get a forced, guaranteed 5 rupee drop from the next enemy that drops items (not in the X group). Kill the 10th enemy with a bomb instead, and instead of a 5 rupee you'll get a forced, guaranteed bomb drop!
Kill 16 enemies in a row and you get a fairy drop forced, but only if the 16th enemy is capable of dropping an item (not in the X group).
Note that if the 10th enemy does not drop items (in the X group), then killing that enemy with a bomb means the next drop that does happen will be a bomb. Killing that 10th enemy with the sword or any thing else will mean the next drop will be a rupee, even if you kill the next-dropping enemy with a bomb. It's the actual 10th enemy kill that counts, not the succeeding enemy that drops items.
However if the 16th enemy does not drop items, the fairy drop will be skipped entirely, and another one will not happen unless you get hit and the counters reset.
In some rooms that drop an item (such as the 5-Stalfos room in Level 1 that gives a key at the end), one enemy will act like it was holding the drop like a stalfos with a visible key, or a gibdo with a visible bomb. As a result, that enemy will never drop anything, and it will be able to store a forced drop and/or bypass a fairy drop, just like enemies that never drop items.
Note that splitting a Zol into two Gels, or splitting a Vire into two Keese, will not count as a kill or a consecutive kill. Killing one of those split Gels or Keese will not count as a kill for drops, but will count as a consecutive kill. Yes, there are some circumstances that are an exception to this. If the Zol is trapped against a barrier, it can sometimes trigger an extra 'kill' that way. A kill sound in place of a split sound indicates that this has happened. This does not occur with Vires.
Further note: Multiple simultaneous kills will not take you past 10 on the consecutive kill counter, per Darkwing Duck. If they would take you past 10 they leave you at 10 instead.
Advanced strategies: If a forced bomb/rupee or forced fairy drops, the consecutive counter for bombs/rupees is reset, but not the counter for fairies. So no matter how many hits you get on Manhandla with one well-placed bomb, the 10 count is reset after defeating him. The same is true of Dodongo. Likewise with a "Hippo Fairy" (going into a Patra with 7 on the consecutive counters, so that the Patra's center will be kill #16 and get a fairy), the bomb/rupee count resets to 0. Credit to Khananaphone for this discovery.
This means that if you get a forced fairy drop, the next consecutive bomb/rupee kill will not be at 20. It will be at 26. So bomb/rupee drops work in one of two methods:
- 10, (Fairy at 16), 26, 36, 46...
- 10, (Skip fairy at 16 by killing non-dropping enemy), 20, 30, 40...
Credit to Darkwing Duck for this discovery.
Luck Manipulation
See The Legend of Zelda/Luck Manipulation
The Recorder
The recorder loops you through all the dungeons for which you have the Triforce, sequentially, according to the direction Link is facing. It has an internal counter that starts at 1. The counter changes every time you blow the recorder in a place where the whirlwind can appear (that is, any overworld screen where the recorder doesn't spawn a staircase). If Link is facing up or right, then the counter goes up to the next completed dungeon. If Link is facing down or left, then the counter goes down to the previous completed dungeon. The counter wraps around as needed. This counter is only initialized on power-on or reset, and so it does not reset during the run or even if you switch save files.
Let's look at some examples:
- You've completed levels 1, 3, 4, and 5 and haven't yet blown the recorder. If you blow the recorder once facing down, you will be taken to level 5, because the counter started at 1 and then looped around to 5.
- You then blow the recorder 3 more times while facing down. The counter will go 4, 3, 1, skipping 2 because level 2 is not completed. The whirlwind would then take you to level 1.
- You then blow the recorder once facing up and then once facing down. The counter goes from 1 to 3 and then 3 to 1, so the whirlwind would take Link to level 1 again. This technique is used in some routes.
Note that if you turn on the same frame that you use the recorder, the counter will change as though you were facing the old direction, not the new direction. This is a common source of recorder mistakes. Also, level ordering in the second quest is different, and this affects the order for the recorder. Levels 2 & 3, 4 & 5, and 7 & 8 are swapped, so the counter goes 1, 3, 2, 5, 4, 6, 8, 7.
Bombing Darknuts
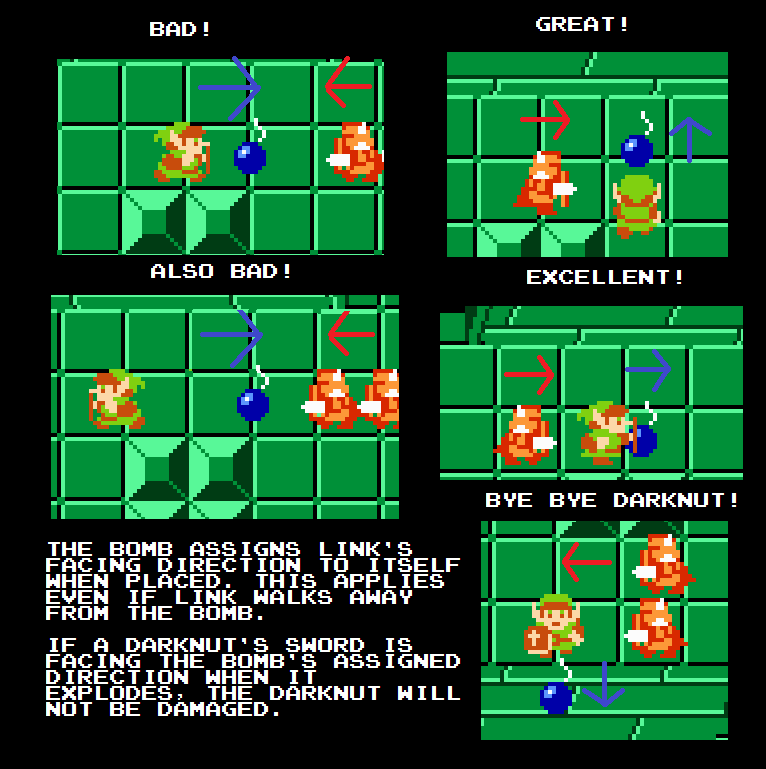
Whether a Darknut blocks a bomb's explosion with its shield is determined by two things. First, the direction Link is facing when he lays the bomb. Second, the direction the Darknut is facing when the explosion hits him. If Link's position when laying the bomb is facing the direction the Darknut is looking when the bomb goes off, the bomb won't work.
Here is a graphic by Lackattack24.
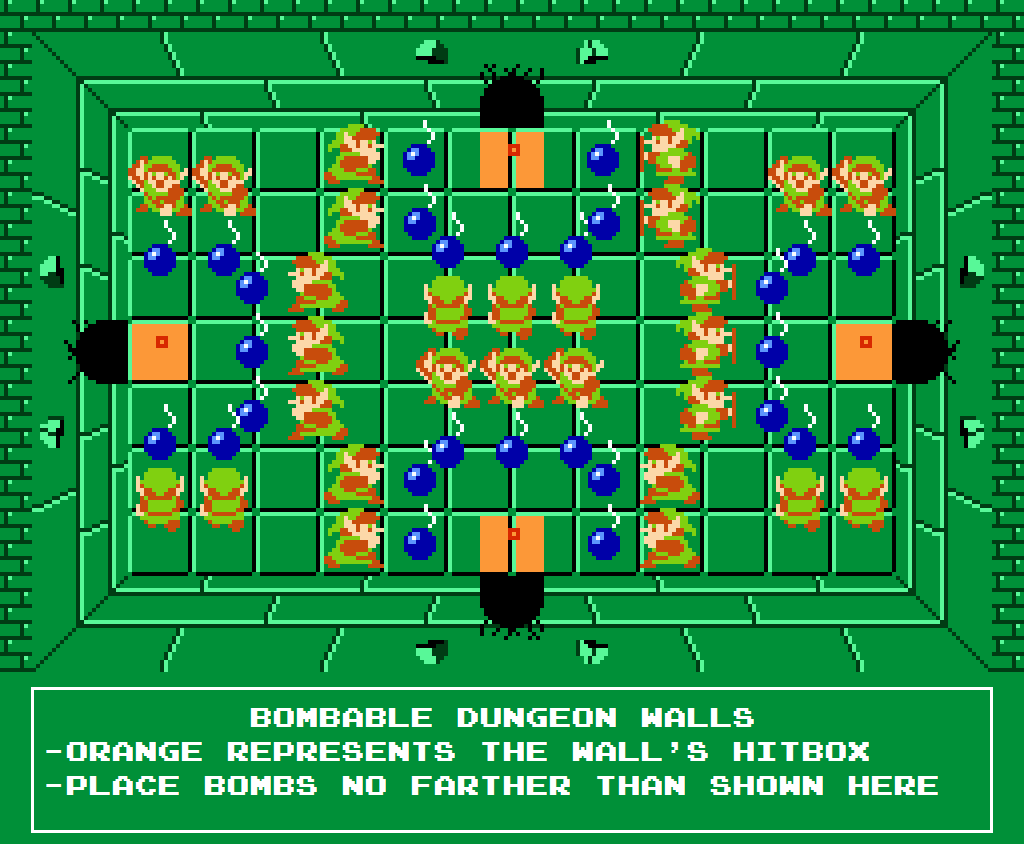
Bombing Walls
Note that bombs do not check to see if a hole should be opened whenever a shutter is opening or closing. Beware of that.
Image by Eunos on positioning:
Free Locked Door
If you enter a dungeon and the first room has a locked door on top then you can leave and immediately reenter to unlock that door for free!
Walking through enemies
If an enemy has just been hit, then Link can temporarily walk through that enemy without damage or knockback. However the enemy itself must not be knocked back or split in order for that to work. So this doesn't work against Zols or Vires. Striking a Darknut's shield also prevents this from working.
Enemies won't be knocked back if hit perpendicular to their movement direction while they're between tiles. When they're directly on a tile, they can be knocked back in any direction.
Link normally stops walking temporarily when using the sword. Exceptions to this are while stepping onto the ladder (useful in 7 after the hungry Goriya, and in 1 to steal the key from the Stalfos after the Gels), and when stepping into a door (useful in 9 when skipping the first Patra). Catching a boomerang while stabbing will also allow Link to start moving immediately.
Skipping Patras
Walking through Patras is a special case. It turns out that the orbiting eyes of the Patra don't actually exist hitbox-wise right away. This gives you time to walk through them. This is important for being able to actually skip the first Patra in level 9, when going toward the Old Man who talks about the Next Room. It's also great for trying to skip the second Patra, on the way back from the Silver Arrows, going toward Gannon.
Note that when walking through that first Patra, there's a trick to it. You can't just walk through the door. You have to hesitate after unlocking the door, before going through, and stabbing your way through the eye that will otherwise hit you.
Skipping the second Patra going toward the Silver Arrows is a matter of getting a good pattern of movement, and getting your block clip quickly and accurately.
Sadly the Patra before Gannon cannot be skipped with present knowledge.
Additionally, in Level 9 there's a special "reverse" block clip that's very useful to get done quickly, to get out of the wizzrobe room immediately south of the Silver Arrows. It's in theory a standard block clip, but it's coming from the opposite direction most runners do a block clip from, and it's under immense time pressure.
Here's a video of the Patra skips and the reverse clip in level 9, from LackAttack24's 29:56 then-WR run.
Heart Duplication
Only possible in the 1.0 FDS version? https://www.youtube.com/watch?v=4iGwBE4aAzU
Recorder Wrong Warping
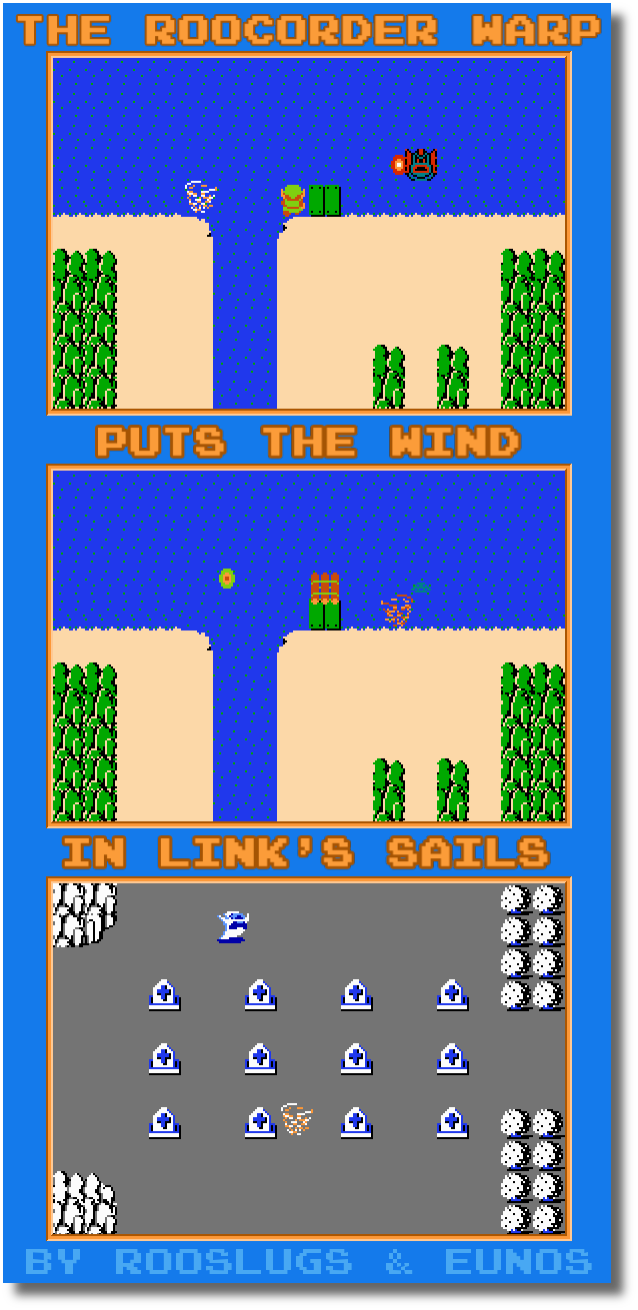
Fiskbit: Regarding the technical stuff: The raft and whirlwind both set Link's direction when picking him up. Because Link gets picked up by the raft second, his direction is set to up, which determines the scroll direction. Because he's in the whirlwind, the recorder destination (which is one screen left of the target level) is used as the screen he's scrolling from, and the direction from the raft makes him scroll up.
Fun fact: Both the whirlwind and the raft are controlling Link's position. The whirlwind modifies only his X position, while the raft only modifies his Y position, so he winds up moving diagonally while being carried by both.
Eunos: Required execution for Roocorder to save time vs. properly executed current WR route strats. https://youtu.be/MJ7HDzrUUrk
Other Technical Information
There are a lot of small interactions and weird corner cases in this game. Here's a section of the site dedicated to them.
Legend of Zelda/Technical Information
Fighting Bosses
Tutorial Videos
The Legend of Zelda/Tutorial Videos
The Legend of Zelda/Room Tutorial Series
Routes
Routing of this game changes all the time. But here are some resources.
Again, Order of the Ate is a very good site for referencing routes.
If you're better than that, you need to start looking at routes used by top runners, and do research.
Here's some of that research:
- Saver's route tracking maps.
- Eunos has been putting together some documents: Updating Saver's maps and 100% route document.
- The routing channel on Lack's LoZ discord is invaluable for routing.
Some notable historical routes:
Here's Tom Votava's 34:04 run from 2003, which was a good route if you didn't know anything at all about block clips, screen wraps, or item drop manipulation.
Darkwing Duck's 31:25 is notable as an upgrade from that, beginning to incorporate modern knowledge of the game.
Saver had an sub-30 run early, that skipped the Magic Sword. It's a tough route, but valid, though the video has been lost to the public.
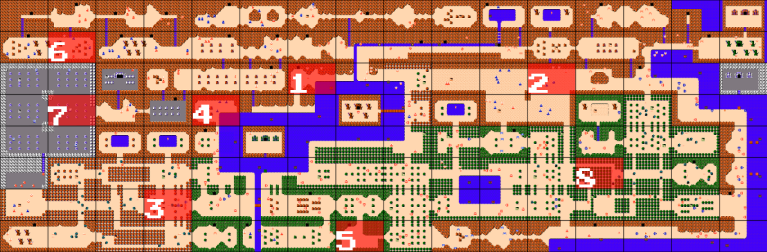
Maps
The instructions above assume you know the overworld map, as well as where to get everything inside the dungeons themselves. For maps see NESMaps.com, including dungeon maps and a fully annotated overworld map.
Records
See Speedrun.com
Randomizer!
See The Legend of Zelda/Randomizer for mechanics and techniques specific to Fred Coughlin's Legend of Zelda Randomizer
Tools
How to patch a ROM? Get an IPS patcher, such as:
ROM Patches
These work in a real NES
Practice Hack in development. Shows drop counters. Later may give other useful information.
Buffet 1.2 practice hack by Fiskbit. Displays a timer, drop/spawn/recorder counters, and screen scroll / block clip help. Has a select menu for editing inventory, screen/level warping, and features like making Ganon visible. Archive also contains no-music hacks and FCEUX LUA scripts for things like hitbox and enemy targeting visualization.
AI target viewer by Fiskbit (in the form of an IPS patch from the PRG0 ROM)
Patch to remove screen flashing by @ireneista
Lua scripts
These work in select emulators
Hitbox visualizer script v1.2 by Fiskbit
Reading the code
Complete disassembly by Aldo Nunez
Miscellaneous
Avidemux is the best tool out there for timing runs.
History
World Record Progression: The Legend of Zelda